Connector Overview: Let AI Use "Your Own Account" to Spread Content Across the Internet

Connector Overview

Previously, we discussed commissions, white-label sites, and API reselling, all of which revolve around the same question: How do you get more people to see you and click your invitation link?

Content marketing is the answer, but writing, formatting, uploading images, and publishing on one platform at a time is too exhausting—most people give up after a couple of days.

The Connector is here to solve this issue. In one sentence, here's what it does:

You connect your login identities from various platforms (Zhihu, Juejin, Xiaohongshu, etc.) into the system, and then you can let AI search, write, illustrate, and publish in the Studio as yourself. Write once, distribute across multiple platforms, and you speak while AI does the work.

This article is an overview. I will clarify three things: where to enter the connection, the types of connection methods available, and which platforms can truly allow AI to publish automatically (and which cannot, I won't deceive you). Each platform will have a separate article later, and you can follow along to publish your first piece.


This is where most people make their first mistake, so let’s clarify:

There is no /connectors page in the Studio (typing this address directly will result in a 404). The real entry point is hidden in the chat input box:

  1. Open Studio: https://studio.acedata.cloud
  2. On the left side of the bottom chat input box, click the "Add Content (+)" button
  3. Select "Connect" from the pop-up menu
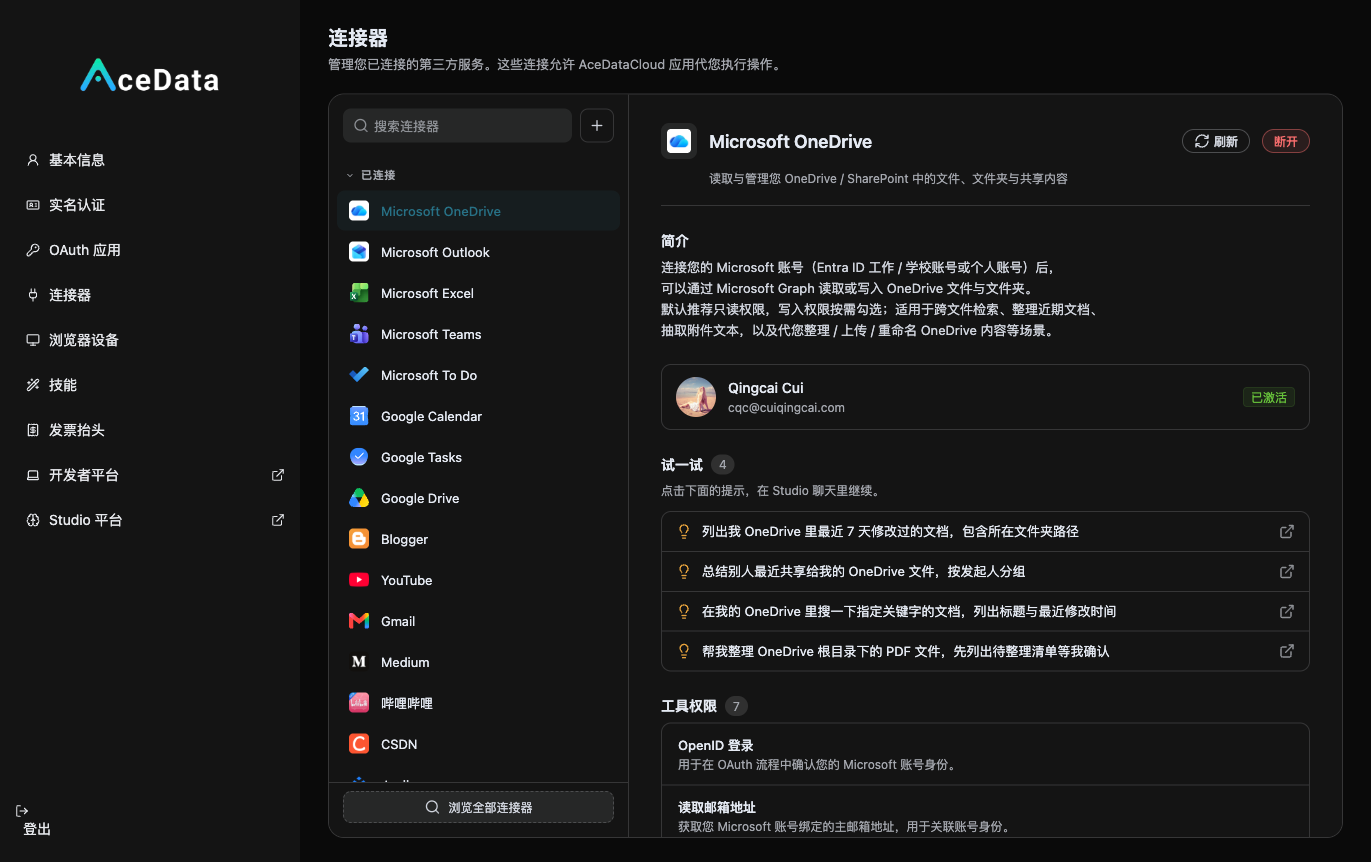
  4. It will take you to the connection management page: https://auth.acedata.cloud/user/connections

Once you reach this page, you will see all the platforms you can connect to, their connection statuses, and the connection methods for each platform.

Connection Page

Remember this path: Studio Input Box → Add Content (+) → Connect. All platform authorizations are managed on the auth.acedata.cloud/user/connections page.

After connecting, the corresponding "Skills" for these platforms will appear in your skills list, allowing AI to know how to use them to publish content. The skills page looks like this:

Skills


2. Three Connection Methods (Determine How Quickly You Can Get Started)

Different platforms have different verification mechanisms, and the connection methods vary. Understanding these three types will help you know how to connect to each platform.

Method 1: BYOC (Bring Your Own Credentials)

This is the most common type, meaning "you provide your own login credentials for the platform to manage." Credentials can take several forms:

  • Login Cookie: You log into your account in the browser and use our ACE browser extension to capture a login cookie. This is how Juejin and Zhihu (reading and writing parts) work. It's the easiest method, no developer application needed.
  • App Password: Some platforms (like WordPress and certain decentralized social networks) generate an "app password" in the backend, which you can copy and paste.
  • API Key / Developer Token: For platforms like Dev.to and Zhihu's open platform search, you copy a key from the platform's backend and paste it here.

The characteristic of BYOC: The credentials are yours, and the capability limit is based on your account's permissions. After connecting, the credentials are securely encrypted and decrypted only when AI needs to use them.

Method 2: oauth_static (Official Platform OAuth, Fixed Application)

This method uses the platform's official OAuth authorization: you click "Authorize," are redirected to the official platform page for confirmation, and then return to connect. This is more stable and standardized than cookies. Platforms like LinkedIn and GitHub use this method.

Method 3: oauth_dcr (Dynamic Registration OAuth)

This is the most "automated" type—through Dynamic Client Registration, it automatically completes application registration and authorization. These connectors will also be automatically mounted to AI as MCP. You basically just need to click a few times to authorize.

Summary: Using cookies (BYOC) is the easiest; OAuth types are more stable but require going through official authorization once. Each platform tutorial will tell you which type it belongs to and how to connect specifically.


3. Which Platforms "Can Truly Allow AI to Publish Automatically"—Honest List

This section is the most important, and I won't exaggerate. Whether AI can automatically publish content depends on whether the platform has a corresponding "Publishing Skill," not just having a connector card.

✅ Platforms with Real Publishing Skills, Can Write "AI Automatic Publishing" Tutorials

These platforms have been verified, and AI can truly read and write content in your identity:

Platform Connection Method What AI Can Do
Zhihu zhihu Dual-layer: Open platform API (search) + Login Cookie (read/write) On-site/global search, view hot lists, read own articles/answers + statistics, publish articles, answer questions (publication requires confirmation)
Juejin juejin Pure Cookie (BYOC) List/view own articles + read/like/comment counts, publish articles, image external link rendering
Xiaohongshu xiaohongshu Local browser automation Login, search, view notes, publish images/articles/videos/long texts, scheduled publishing (drives your local browser)
Bilibili bilibili Cookie (BYOC) Publish columns, cover image webp→png transcoding upload
CSDN csdn Cookie (BYOC) Publish technical blogs, direct image signature upload to OBS
Dev.to devto API Key Publish English technical articles
GitHub github OAuth Create issues, open/comment on PRs, create Gists, push files, publish releases
Hashnode hashnode BYOC Publish English technical blogs
LinkedIn linkedin OAuth Publish updates
Medium medium BYOC Publish English articles, image upload→image-delta
Reddit reddit BYOC Publish posts
WeChat Official Account wechat-official-account BYOC Publish drafts/articles
Personal WeChat personal-wechat BYOC Publish content
Weibo weibo BYOC Publish Weibo
WordPress wordpress Application password Publish articles (self-built site)
X (Twitter) x BYOC Publish tweets, publish threads

⚠️ Platforms with connectors but no publishing capabilities (do not write "AI auto-publish")

Toutiao toutiao, Baijiahao baijiahao, Facebook, Habr — You may see cards in the directory, but they do not have corresponding publishing capabilities, AI cannot publish. Any claims of "letting AI automatically publish to Toutiao / Baijiahao / Facebook" are false, do not believe or write them.

I highlight this separately because content marketing relies on long-term trust — only when you have a clear account in your mind will you avoid promising clients with capabilities that cannot be fulfilled, ultimately leading to failure.


Four, Image Capabilities: Use gpt-image-2 to match images for each piece of content

Good content needs good images, especially for Zhihu covers, Xiaohongshu covers, and WeChat official account header images. Our most popular image API is designed for this:

  • Text to Image:
    curl -X POST https://api.acedata.cloud/openai/images/generations \
      -H "Authorization: Bearer $ACEDATACLOUD_API_KEY" \
      -H "Content-Type: application/json" \
      -d '{"model":"gpt-image-2","prompt":"Tech-style deep blue SaaS cover, theme: AI automatic writing","size":"1536x1024"}'
    
  • Image to Image / Multi-image Fusion (integrate your logo, product images into the cover): POST https://api.acedata.cloud/openai/images/edits, multipart, image[] can be repeated, model=gpt-image-2.
  • Online Interface: https://studio.acedata.cloud/openai-image, if you don't want to write code, just click here.
  • MCP for AI: https://openai.mcp.acedata.cloud/mcp, tools are openai_generate_image / openai_edit_image — let AI adjust its images in scheduled tasks, this is it.

Combining image matching and publishing capabilities creates a fully automated loop of "AI searches hot topics → gpt-image-2 matches images → publishes to Zhihu/Juejin/Xiaohongshu" (see the article "Scheduled Tasks for Automatic Publishing").


The endpoint of content marketing is to turn those who see the content into registered users under your name, allowing their consumption to give you commissions. The method is simple:

  • Your exclusive invitation link: https://platform.acedata.cloud/?inviter=<your user ID>
  • After someone clicks this link, inviter will be saved in their browser for 7 days, and if they register within 7 days, it counts as yours, with a long-term relationship.
  • When letting AI write content, directly instruct in the prompt: "Naturally place my invitation link https://platform.acedata.cloud/?inviter=<your ID> at the end of the article, guiding registration with a tone of 'free trial'".

In this way, every tutorial you publish, every test you conduct, every gpt-image-2 work you create is an entry with a hook. Good content × Efficient distribution × Invitation link = A continuous accumulation of users under your name.


Six, Getting Started (Three Steps)

  1. Connect the first platform: Studio input box → Add content (+) → Connect → Connect your most familiar platform in auth.acedata.cloud/user/connections (recommended to connect Juejin first, Cookie is the simplest).
  2. Let AI write + publish: Return to the Studio chat box, let AI write a piece of content and publish it to the platform just connected. Before publishing, it will ask for your confirmation, as many platforms default to saving drafts first.
  3. Image matching + attach link: Use gpt-image-2 to match a cover image, and let the end of the article carry your invitation link.

Where to Start Reading

  • If you want to start with the simplest → See "Automatically Publish Articles on Juejin" (pure Cookie, quickest to get started)
  • If you want to do C-end marketing → See "Automatically Publish Notes on Xiaohongshu" (local browser driven)
  • If you want complete automation and output while you sleep → See "Automatically Publish Articles with Scheduled Tasks" (this is the killer feature)

Choose the platform you are most familiar with, connect today, and publish your first piece. Once you start, it won't be difficult.