
Want to create your own AI website, do you first need to buy a server, find someone to write code, and then research how to connect models?
If developing from scratch, there are indeed quite a few things to handle. However, if you just want to have a website under your own brand where everyone can directly use AI, there is another hassle-free way: create an AceData Cloud Studio subsite.
Our platform provides ready-made products and underlying AI services; you set the name, select tools, organize the homepage, and then share the website with those who need it. There is no need to first develop an entire system from scratch.
This article will guide you through making it. First complete two things:
- Register an account, and learn about the revenue alliance and your own promotion information.
- Create a Studio subsite, and get a URL that can be opened.
The name, Logo, pricing, and your own domain can all be configured gradually after the site is built.
To clarify first: “two steps” refers to the basic start, not completing all operational work in two clicks. After the website is built, you can use it yourself or share it with others; this is the co-creation alliance we have been working hard to build, and when there are more customers, our services can also be made better.
¶ 1. First take a look, what can Ace Data Cloud Studio do?
You can understand Studio as an AI Agent toolbox in the browser.
If you want to write something, create an image, or try creating music and videos, you can find the corresponding tools here, without needing to write code. The specific available tools are subject to the current page.
| What you want to do | How you can use it |
|---|---|
| Write copy, organize materials | Let chat tools help you outline ideas, revise wording, translate, or summarize |
| Create covers, product images | Enter image requirements, or use tools that support editing to adjust images |
| Create songs | Provide a theme, style, or lyrics in the corresponding music tool |
| Create video materials | Use supported tools to generate videos based on text or images |
There is no need to remember all model names right away; first think about what you want to do, then choose a tool.
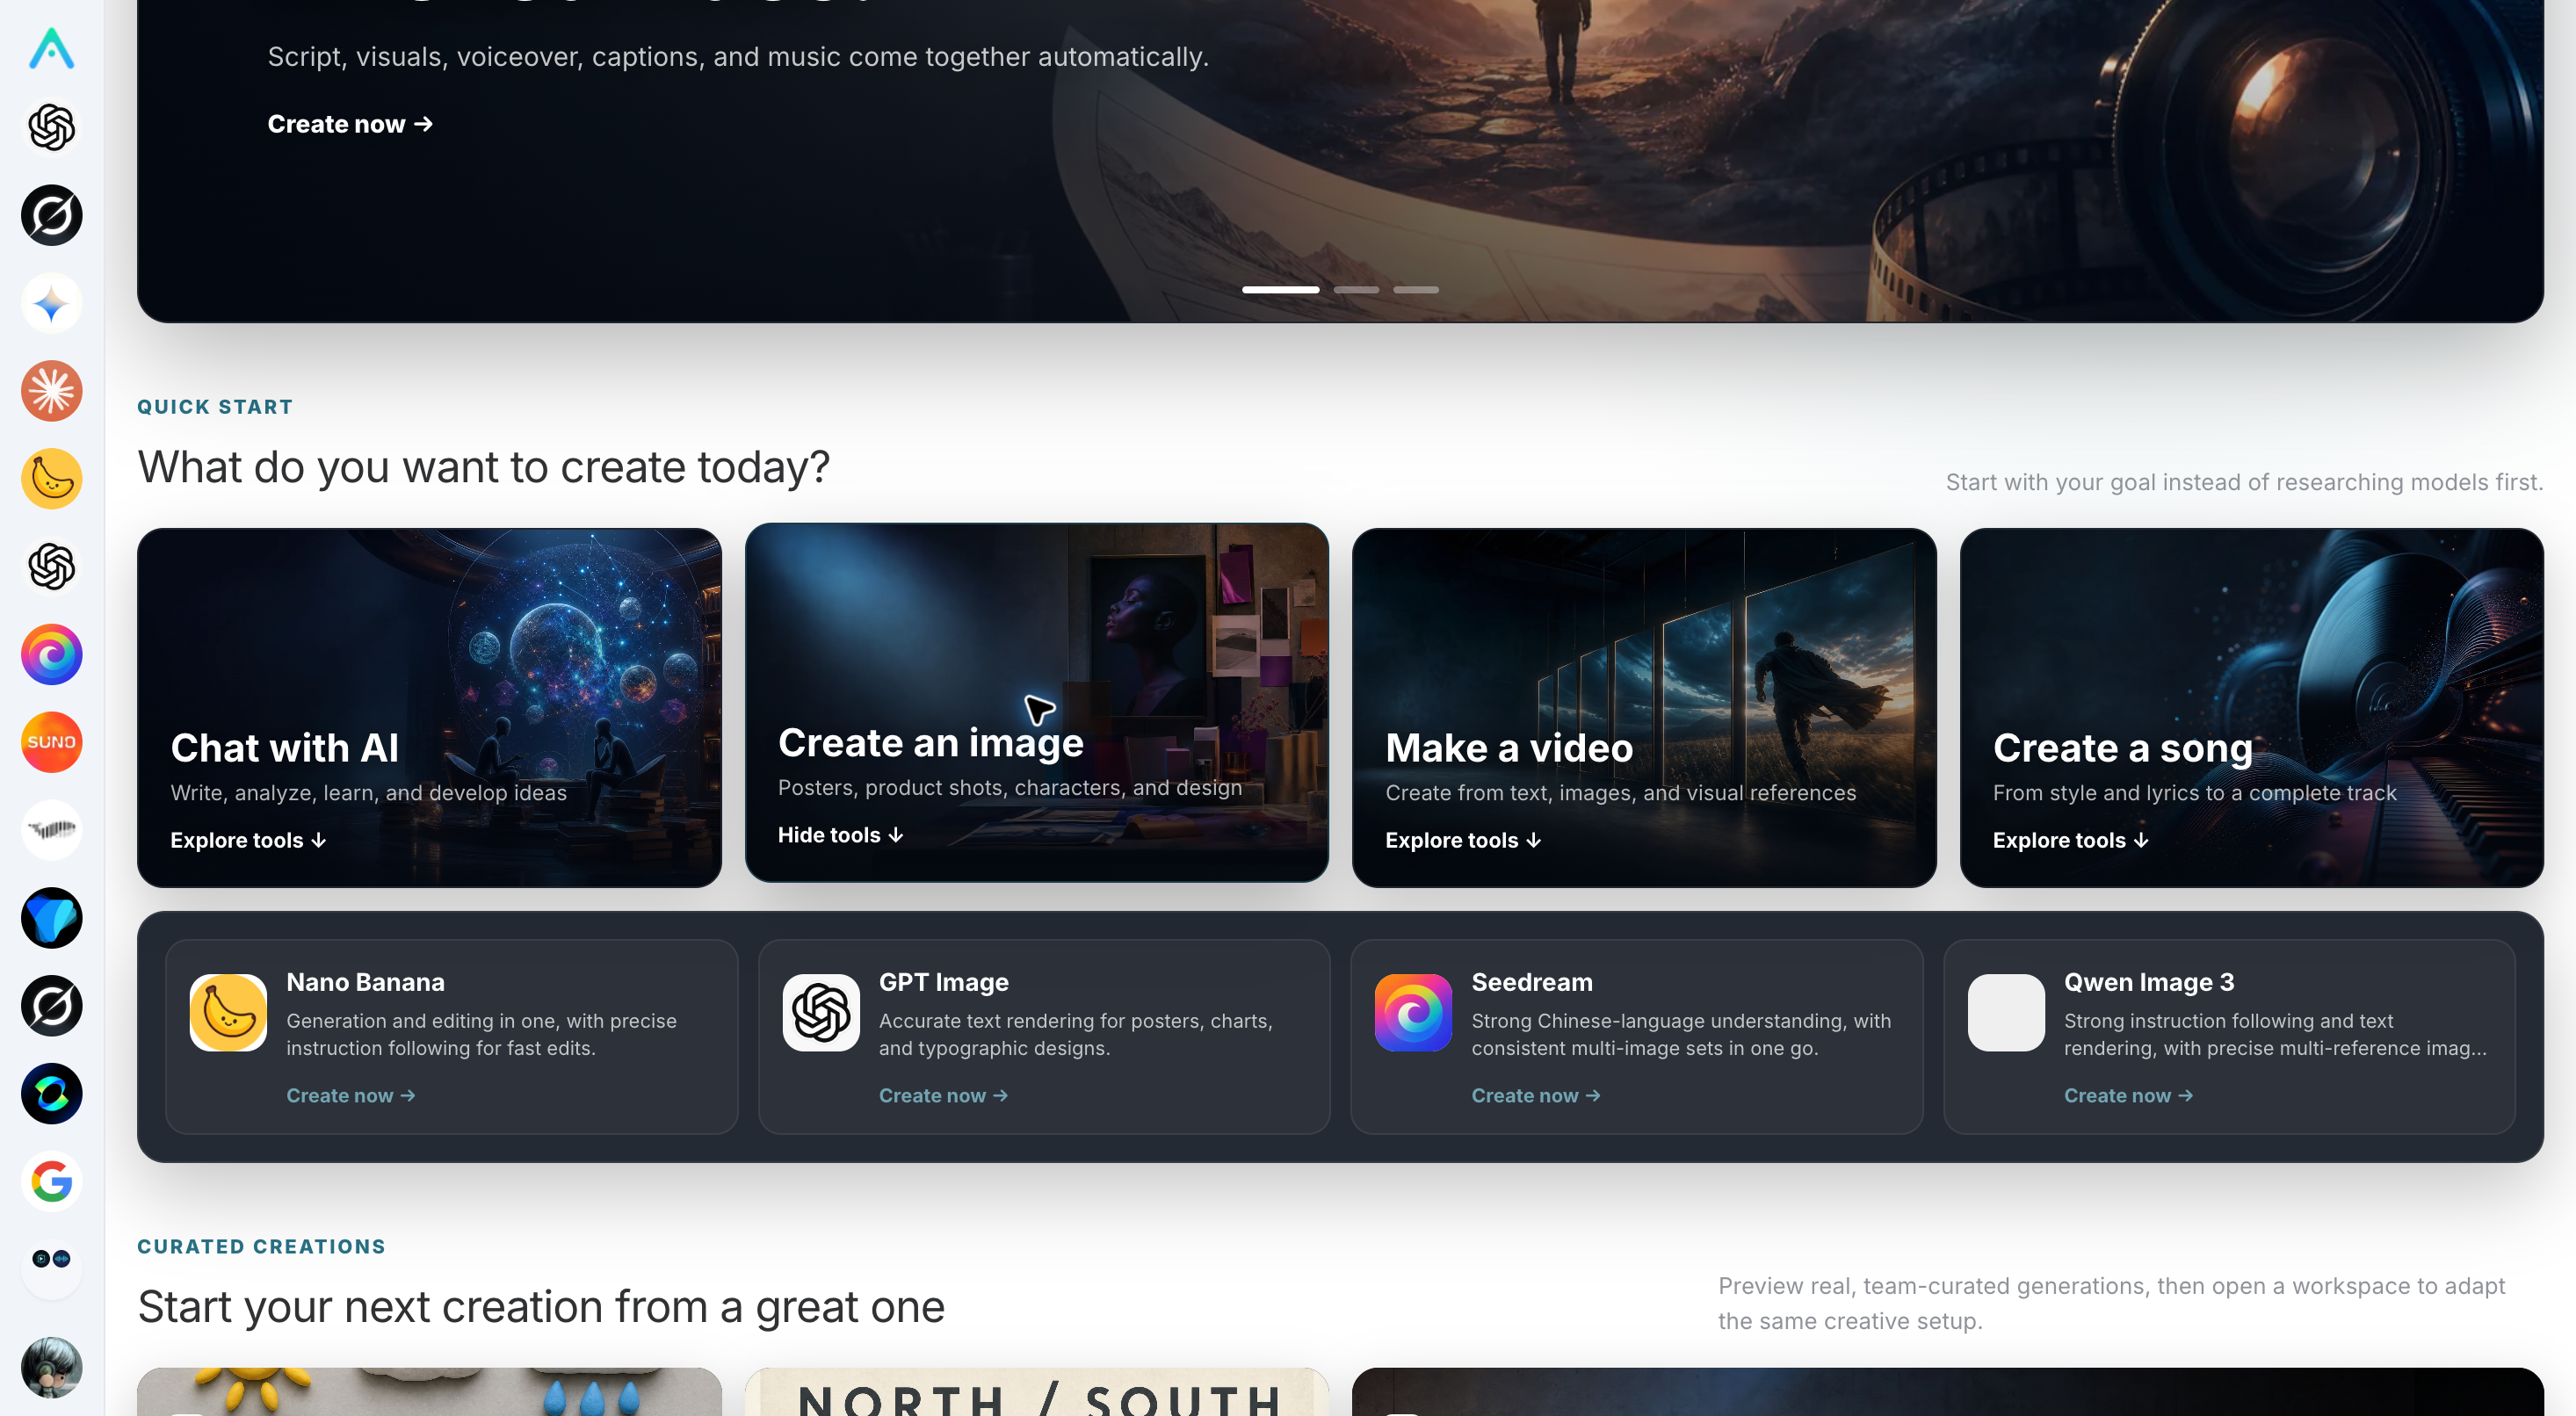
Below is an example of the official Studio homepage. The left side integrates a large number of the most cutting-edge models and functional modules, such as OpenAI's GPT models, Anthropic's models, and Gemini, as well as GPT image2.5, and the famous music creation tool, SUNO V6, all of which we can connect with ease.
What is the relationship between a subsite and this Studio?
Simply put, you do not need to build another set of tools, but configure your own brand entry on top of ready-made products: what the website is called, what Logo it uses, which features it recommends, and where customers can find you can all be organized according to your own needs. The underlying AI services are provided by the platform.
For example, if you mainly help others create article illustrations, you can first clearly introduce image-related tools. There is no need to display all the tools you have never used just to make it seem like there are many features.
In addition, having your own subsite does not mean AI calls are free. Actual generation tasks may still incur costs, so check the pricing of the corresponding service before use.
For product capabilities, refer to: Studio Product and Promotion Guide, White-Label Platform Overview.
¶ 2. Step One: Register an account, learn about the revenue alliance
First, let us clarify the name: in the official documentation, it is called the “Revenue Alliance.” It provides two ways to participate:
- Directly promote the platform: Share your own invitation link and recommend others to use the official Studio or API Platform.
- Operate your own white-label site: Provide services through your own brand entry, and customers’ valid orders participate in settlement according to the current distribution rules.
These two methods do not conflict. You can first experience the products and share tutorials, then create a subsite once you are familiar with them.
¶ 1. Register and log in to Studio
Open the official Studio website, register or log in to your account.
It is recommended to first use a tool you are interested in to complete a small task. For example, organize a piece of copy, or generate an image after confirming the cost. Once you have gone through it yourself, you will have more confidence when introducing it to others later.
¶ 2. Open the distribution page and find your own promotion information
After logging in, go to the Studio distribution page.
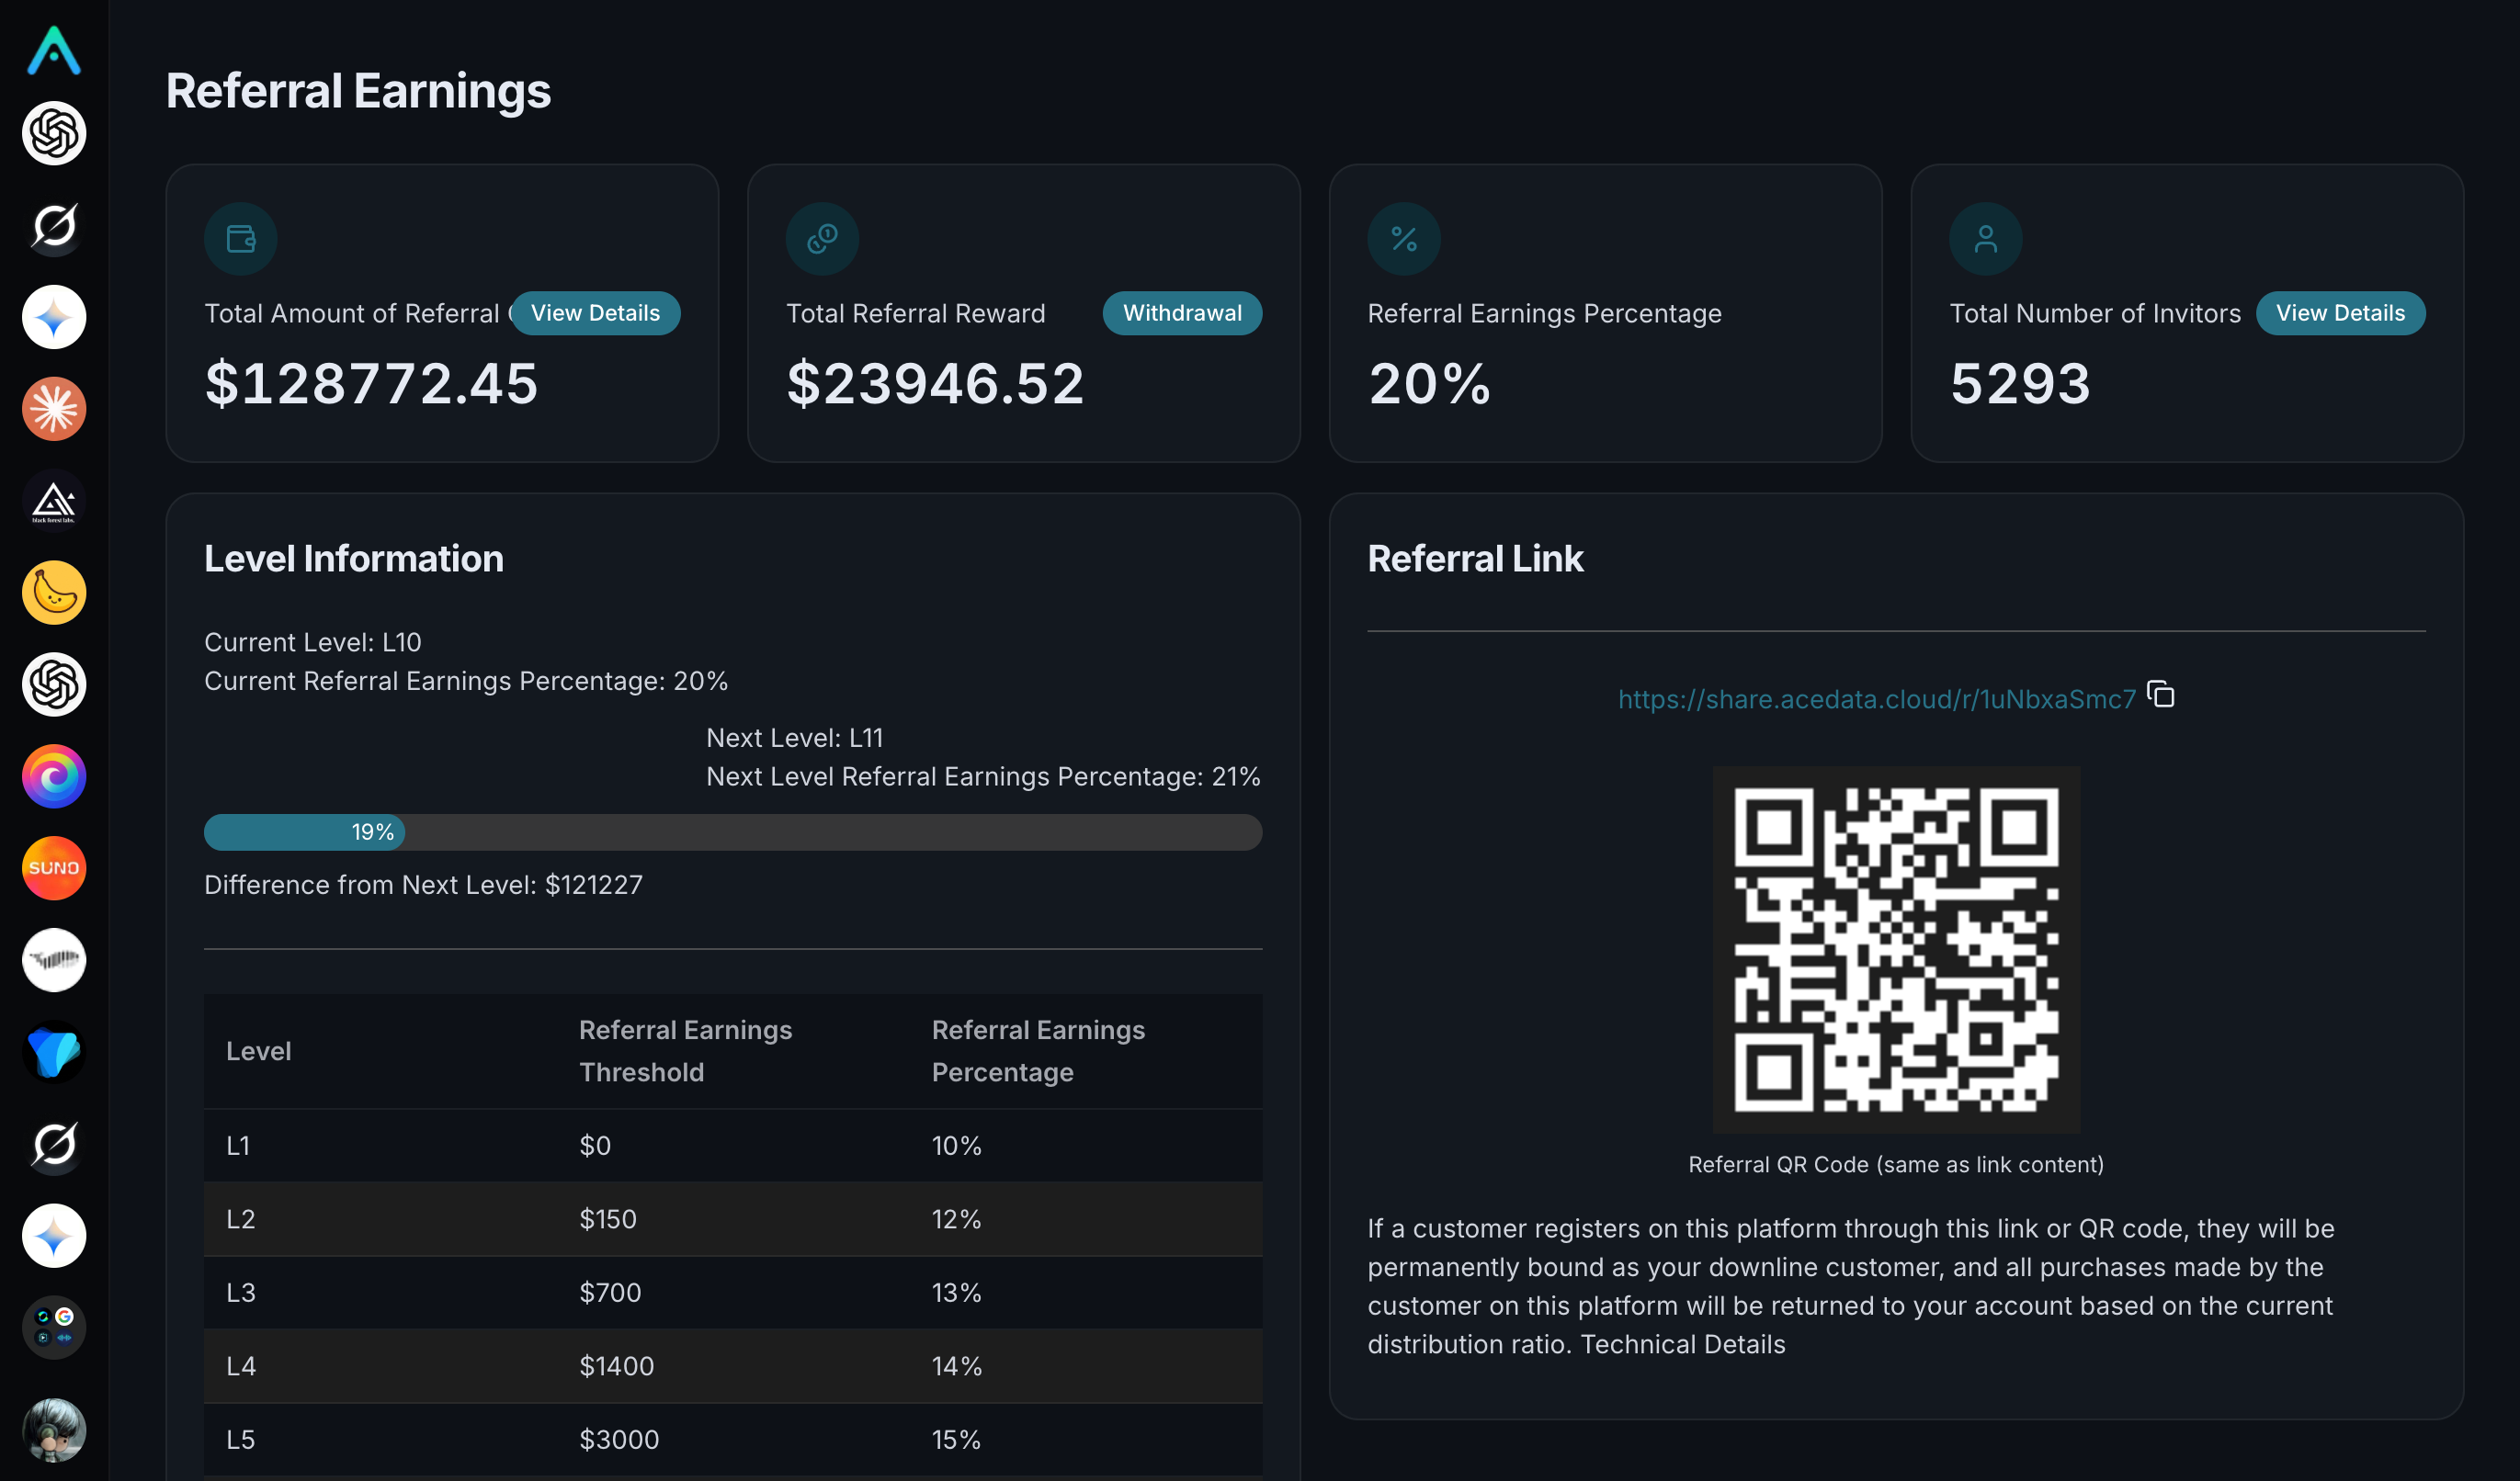
Here, you can find your own referral link and QR code, and you can also view information such as invited users, accumulated commissions, and the current percentage. Directly copy the link from your own dashboard; do not manually modify the user ID.
Below is a historical account screenshot from the official tutorial, only used to help you identify the page. The earnings in the image are not expected income, and the link and QR code are not yours either.
After copying, it is recommended to open it once in an incognito window; if you plan to share using a QR code, also scan it with your phone first to confirm that the entry is correct.
¶ 3. Do you need to buy a plan before creating a subsite?
No, you can register directly; friends in mainland China need to complete real-name verification.
In the management backend, select Site Management from the list on the left, and you can enter the subsite management module.
Detailed instructions: Revenue Alliance Overview, Studio Promotion Operation Tutorial.
¶ 3. Step Two: Create a subsite, then make it look like your own
¶ 1. Find “My Subsites”
After logging in to the official Studio web version, click the user avatar and open in sequence:
Settings → My Subsites → Create Subsite.
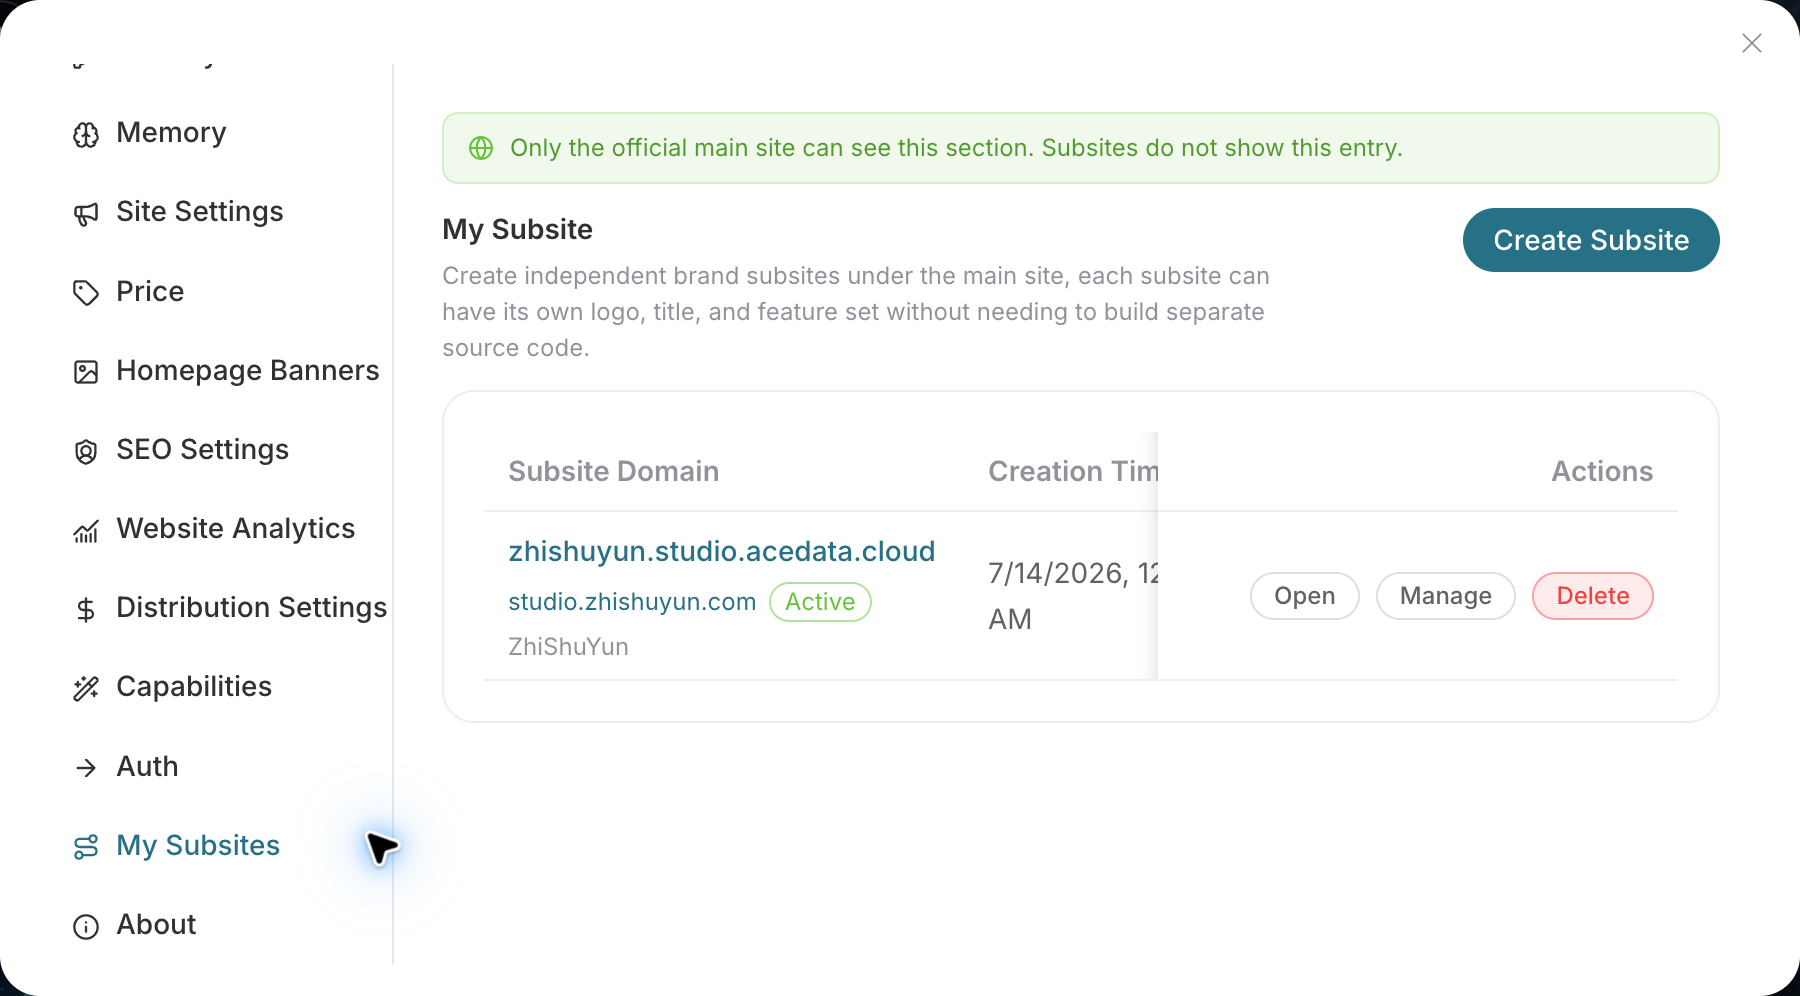
If you cannot find it, first check whether you have opened the official web version. This entry will not appear in the native App or other subsites.
¶ 2. Enter a name, then choose a URL prefix
When creating, mainly fill in two items:
| What to fill in | Example | Description |
|---|---|---|
| Subsite title | Xiaolin AI Studio | The website name customers see, which can be modified later |
| Subdomain prefix | xiaolinai |
The part at the beginning of the system URL |
The prefix needs to use 3–32 lowercase letters, numbers, or hyphens. It cannot start or end with a hyphen, nor can it contain consecutive hyphens; it also needs to avoid reserved names and prefixes already in use. The .studio.acedata.cloud on the right is added by the system, so do not fill it in again.
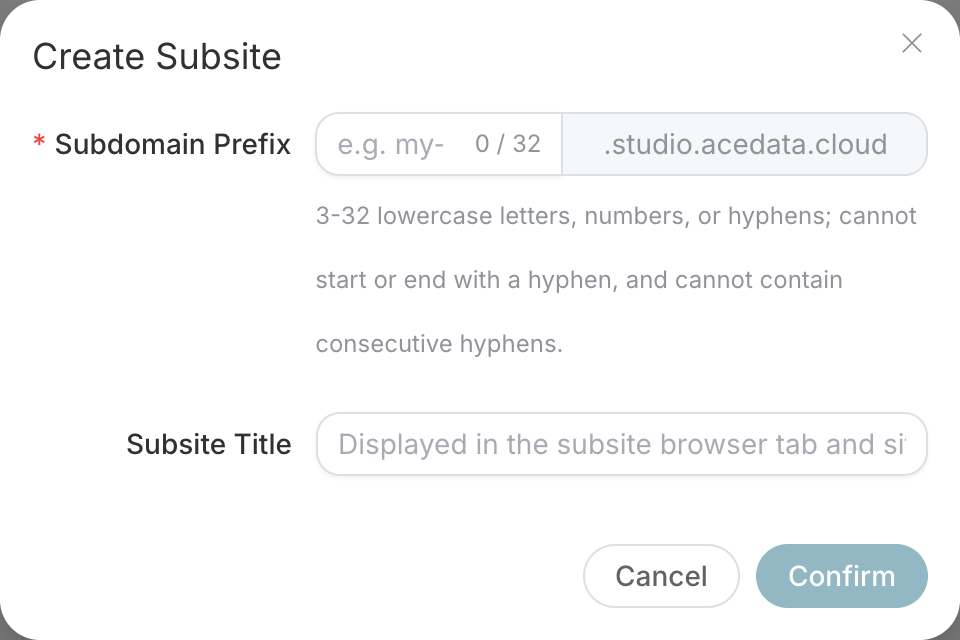
Click Confirm, and wait for the success prompt and the list to refresh. When the new site appears in the list, this step is complete.
There are two buttons here, do not confuse them:
- Open: View the website customers will see.
- Manage: Modify the configuration of this subsite.
First click “Open”, then copy the URL into an incognito window to check whether the homepage and login entry can display normally.
At this point, the basic site setup is complete. The following configurations can be done one by one according to your own needs; you do not need to fill them all in at once.
¶ 3. Use your own name, Logo, and customer service entry
From the subsite list, click “Manage” to enter Site Settings.
First handle four things: the site name, the Logo on the page, the Favicon on the browser tab, and the customer service entry through which customers can contact you.
Logo and Favicon are in two places and need to be set separately. The pencil icons next to the page title and image are the editing entries.
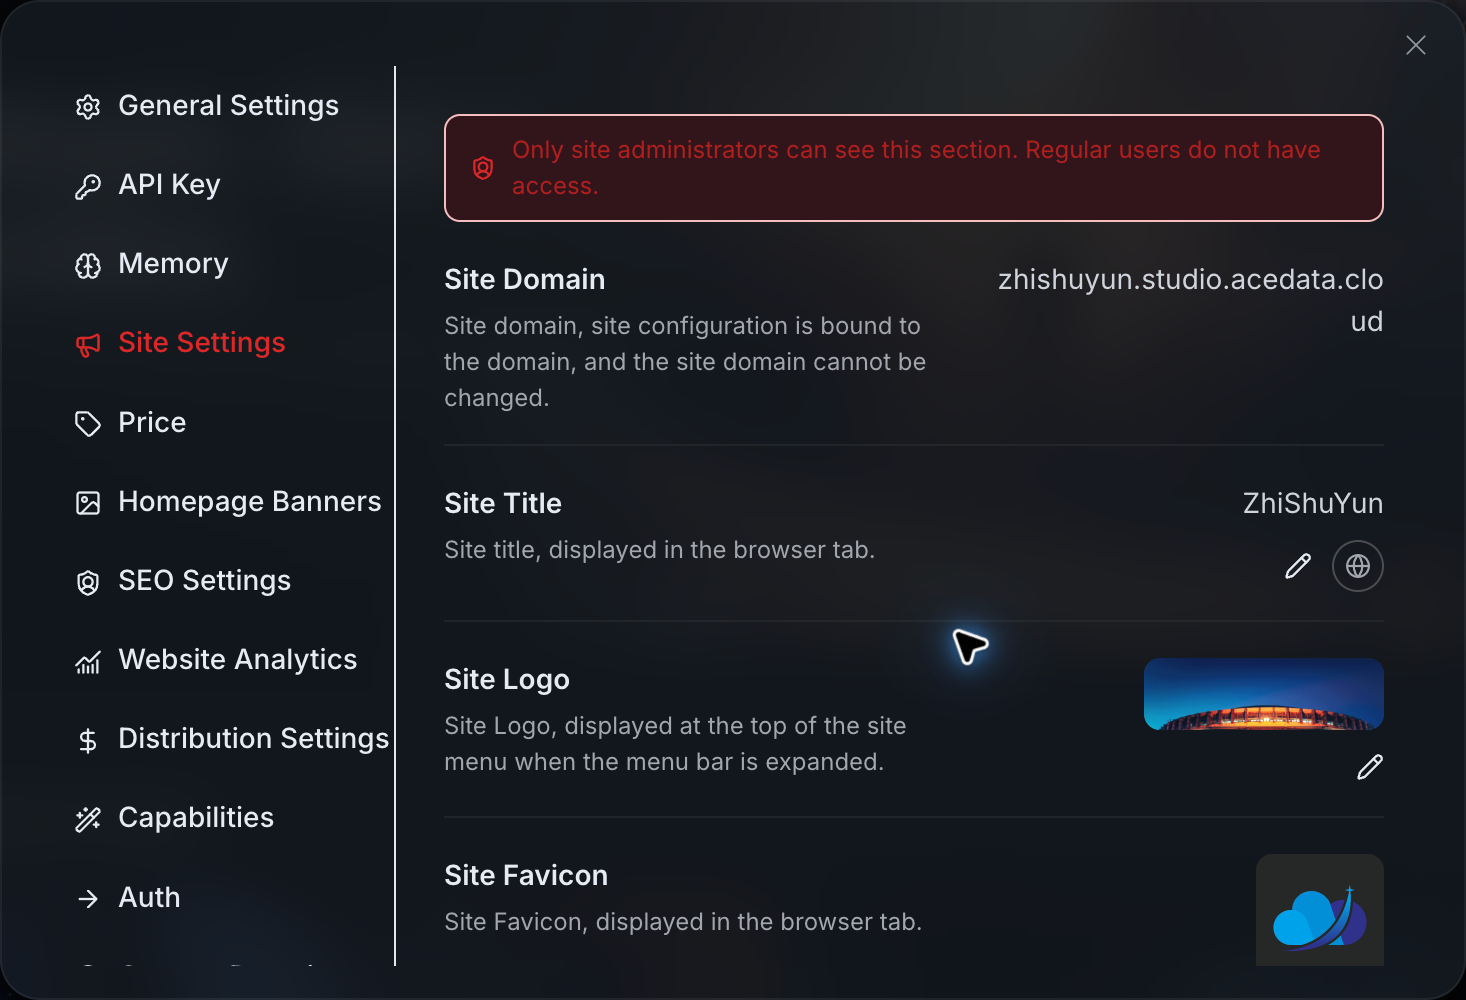
Continue scrolling down, and you can also set the brand color, available languages, and forced language. If you want visitors to choose their own language, do not accidentally enable “Force Language”.
The site introduction does not need to be grand. One sentence that people can understand is enough, for example:
An AI tool site prepared for content creators: write copy, create images, and contact me if you have questions.
Then go to “Authentication” and keep at least one available login method. After saving, try logging in once from an incognito window to confirm that you can return to your own subsite.
¶ 4. Choose tools and organize the homepage
Open Capabilities, and select the tools you plan to provide. For those you are not working on for now, you can first turn off their display entries.
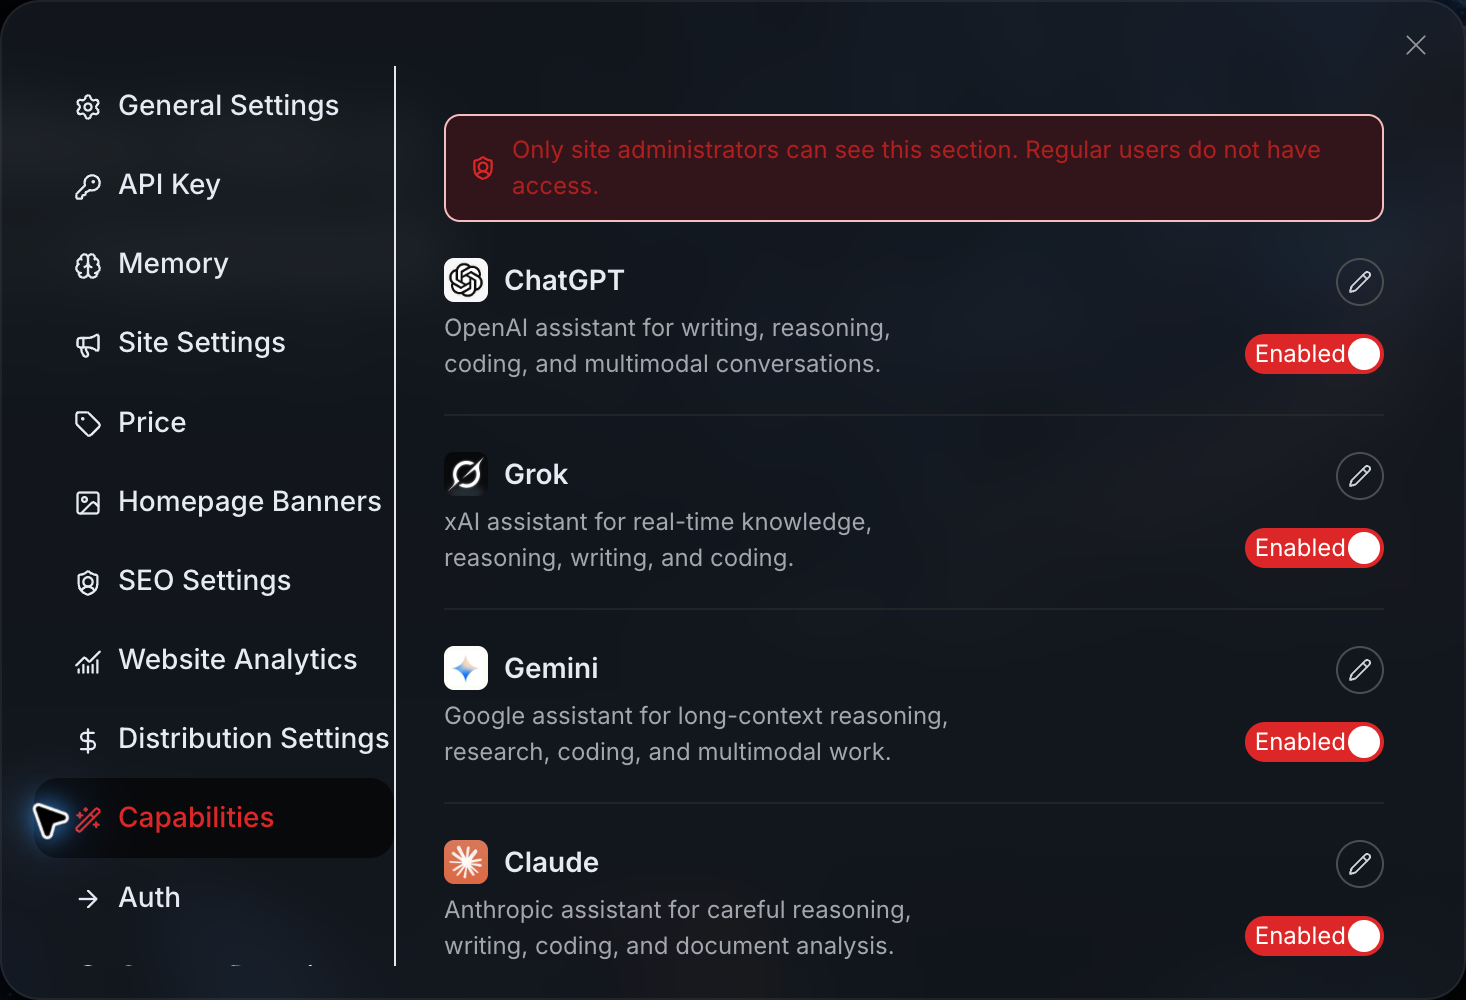
For the first version, you may as well focus on one purpose. For example, if it is mainly for self-media users, first clearly explain writing and images; if it is mainly for music enthusiasts, first prepare the usage instructions for music tools.
If you want to further organize the homepage, you can enter Homepage Settings → Creation Scenarios to adjust the scenario name, description, cover, order, and the tools recommended under the scenario.
A reminder here: turning off a display entry only prevents it from appearing in the corresponding location; it does not mean revoking the customer’s API calling permissions.
¶ 5. Set prices: standardize first, then handle exceptions
Enter Price, where you can set a site-wide markup ratio; if a certain service needs separate pricing, then add a per-service override.
The per-service ratio takes priority and does not stack with the site-wide ratio. Leaving the per-service markup blank means inheriting the site-wide setting; entering 0 means no markup, not free.
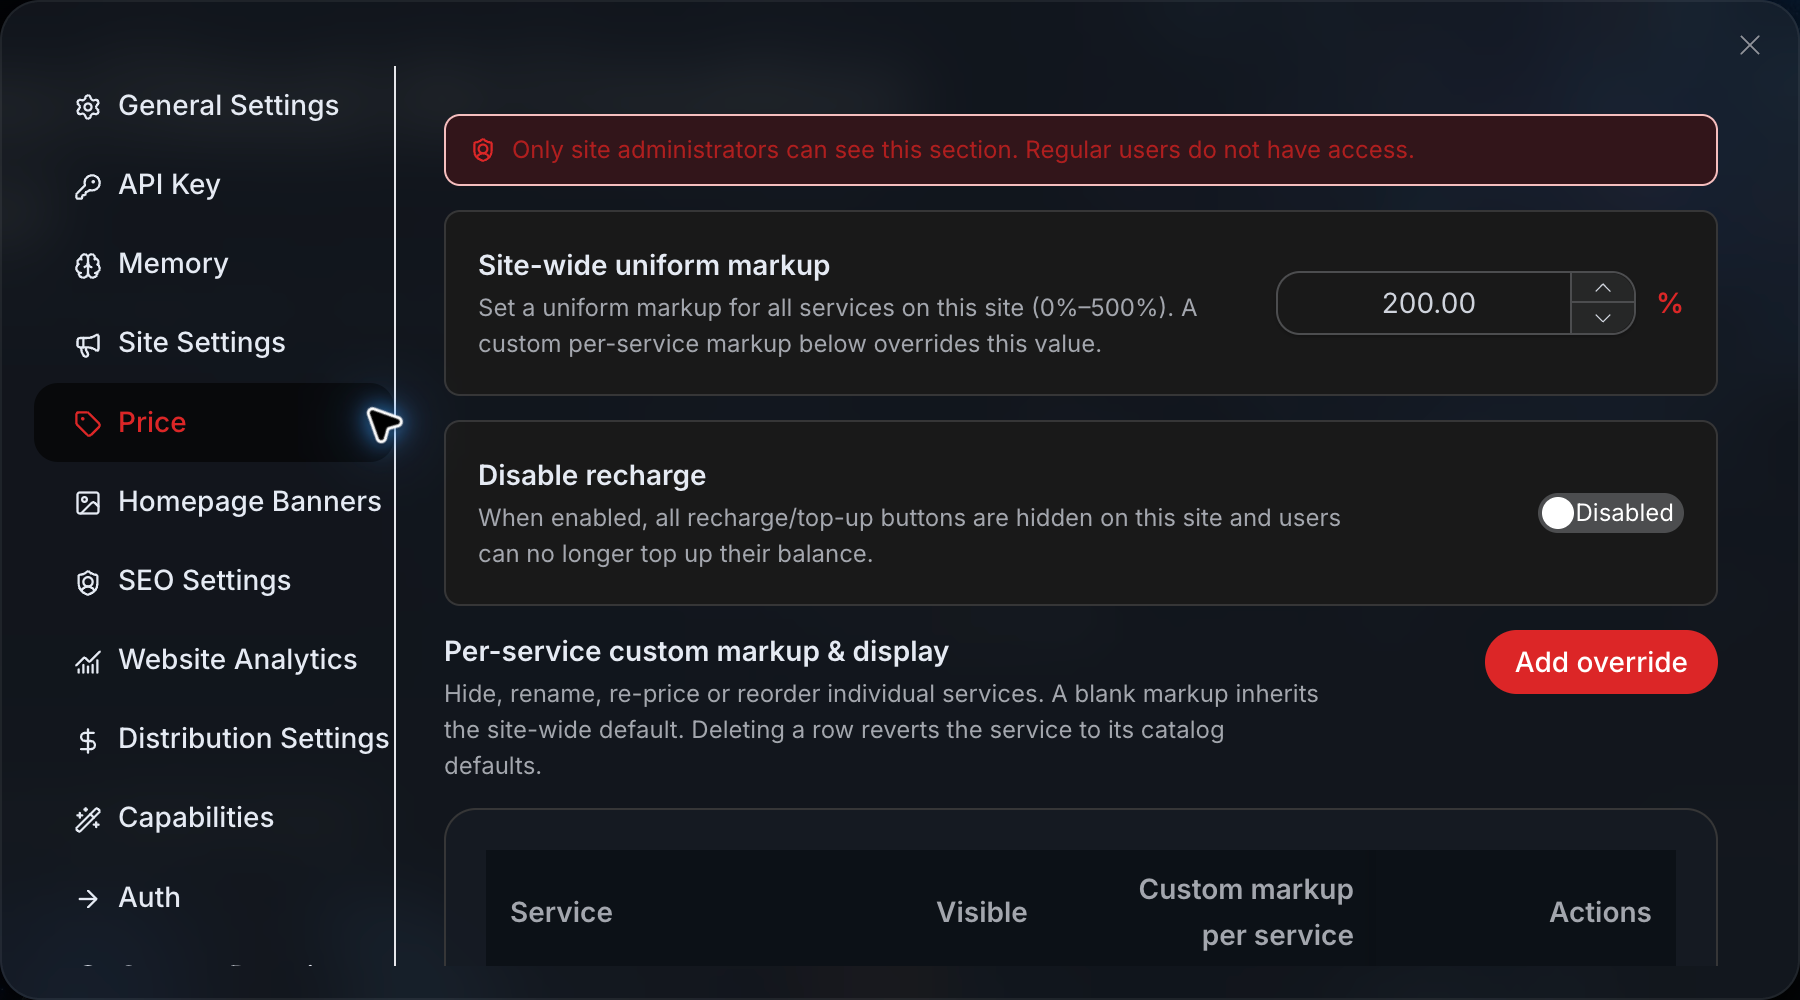
To give an easy-to-understand example: suppose the platform price is 100, and the site-wide markup is 10%, then the channel price is 110; if this service has a separate markup of 5%, then the channel price is 105. The actual payment price needs to be checked on the checkout page.
However, this markup is not your commission ratio. How earnings are calculated will be explained separately later.
¶ 6. Advanced settings: bind your own domain name
Once the system URL is working, then consider changing to your own address, such as ai.example.com.
You first need to have a domain name and be able to log in to its DNS management dashboard. Then enter the binding page from My Subsites → Manage → Custom Domain.
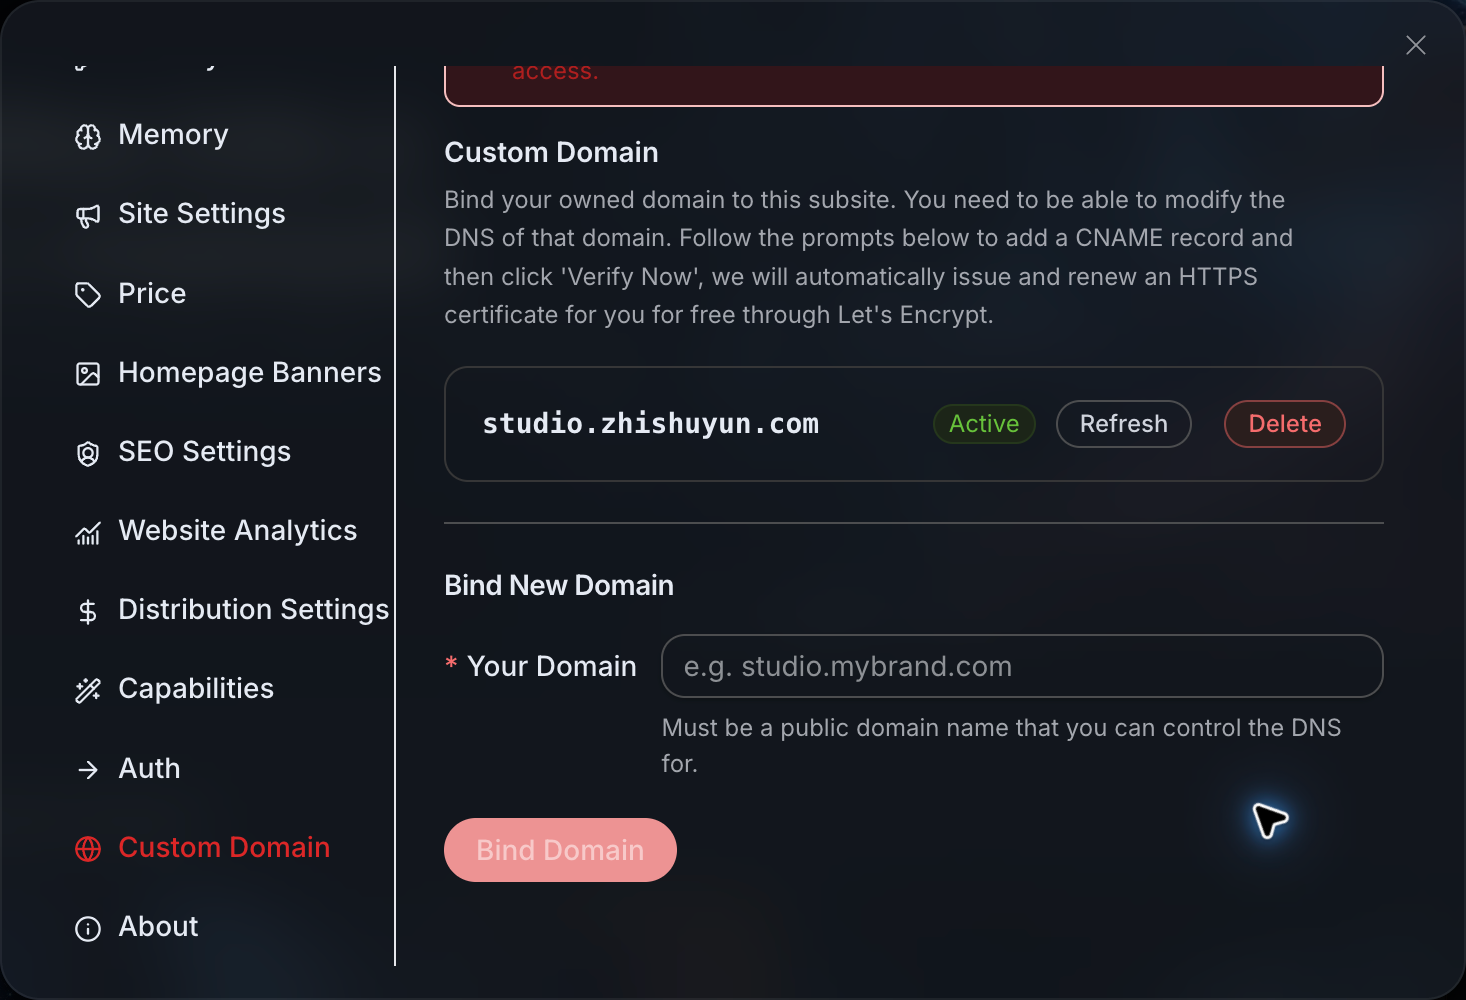
Operate in this order:
- Fill in the full domain name, for example
ai.example.com, withouthttps://, a path, or a trailing slash. - Click Bind, and copy the CNAME target provided on the page.
- Go to the DNS console of your domain provider and add a DNS record.
- Return to Studio, and verify or refresh the status according to the operations provided on the page.
- After both DNS and HTTPS are ready, then open your own official URL.
Usually, you can fill in the DNS record like this:
| Field | Example |
|---|---|
| Record type | CNAME |
| Host record | ai, depending on your domain provider’s requirements |
| Record value | Copy from your own Studio console |
| TTL | First use the provider’s default value |
Do not copy the CNAME from the screenshot, and do not casually delete DNS records for existing services just for a new site. When a record with the same name already has a purpose, confirm it first, or use a subdomain that has not been used before. DNS updates and certificate issuance both take time, and it cannot be guaranteed that they will be completed in a fixed number of minutes.
Finally, check once each on a computer and mobile phone:
- The homepage can open, and the title and Logo are correct;
- After opening an internal page, refreshing does not cause an error;
- After logging in, you can return to your own site;
- The main promoted tools and customer service entry can open;
- Prices, terms, and privacy statements have been checked.
When you need to compare the operations, you can respectively refer to: Create Subsite, Brand and Login, Features and Pricing, and Custom Domain.
¶ IV. The website is ready. How do you promote it? How do you view earnings?
¶ Do not post URLs everywhere first; first create an example that others can understand
When you’ve just set up a site, it’s easy to want to post in every group: “My AI website is live, welcome to try it.”
But others may not yet know what this has to do with them.
It’s better to start with a specific question: How do you make an article cover image? How do you improve a piece of copy that is hard to read? If you have a few lines of lyrics, how can you try turning them into a song?
It is recommended to share in the format of “result + steps + access link.” Clearly explain the process you have actually used, then include the website link. For official cases that you have not personally tested, write “official case”; do not turn them into your own experience.
If you do not know where to start, you can find short copy, long articles, and images in “Customer Acquisition and Growth → Promotion Asset Library” of the official Earning Alliance. Before using them, check whether the models, prices, and links are still applicable, and do not treat someone else’s QR code in sample images as your own access link.
¶ Before sharing your own site, first check customer attribution
When operating a subsite, also open My Subsites → Manage → Distribution Settings and verify the invitation relationship configuration.
The “default relationship” and “forced relationship” here are not the same thing. A forced relationship overrides promotion links, invitation Cookies, and default relationships, so it is not recommended to enable it directly before understanding the instructions.
It is best to ask a genuinely new user to enter your site from a fresh incognito window and register, then check the attribution in the distribution backend where you have permission.
Existing accounts will not automatically be rebound as your customers just because they log in to your new site again.
¶ Exactly when is commission generated?
You can understand the process as:
A new user registers and establishes an invitation relationship → completes a top-up or purchase that meets the rules → the order reaches completed status → the backend generates a distribution record.
Clicking a URL or registering an account does not itself generate commission; nor does each image generated by a customer separately return another promotion commission. Commission comes from completed top-up or purchase orders that meet the rules.
So, what is “automatic” is that the system generates a distribution record after the conditions are met; it does not mean you no longer need to manage anything after setting up the website. Bringing people in, teaching them how to use it, and handling after-sales issues still need to be done by you.
¶ What is the rate? You can first calculate a simple example
The official commission rules page listed a base-tier rate of 10%–24% when this article was compiled, but this is not a fixed rate that everyone receives. The actual rate may also involve upper- and lower-level sharing or applicable bonuses, and the actual rate displayed in your own backend should prevail.
For ease of understanding only, assume:
- The effective commissionable amount ultimately recognized for an order is USD 100;
- Your actual applicable rate at that time is 10%;
- There are no other adjustment items.
Then the commission in this example is 100 × 10% = USD 10.
This is not an income forecast. Refunds, risk controls, order status, and the rules at the time may all affect the actual record. The final available amount, withdrawal method, and processing time also depend on the backend and applicable policies; the current rules page indicates that you should contact platform customer service if you need withdrawal assistance.
Also, to emphasize the point that is easy to confuse above: the channel markup you set and the distribution income you receive are two different things.
You cannot directly treat “customer selling price minus platform price” as your own income. White-label customer earnings still need to be verified according to valid orders, invitation relationships, and distribution rules. For details, refer to Customer Attribution, Markup, and Distribution Earnings.
¶ After publishing it, focus on three things
It is recommended not to focus first on how much you earn every day, but instead confirm the following in order:
- Is anyone using it? Does the content you share solve real needs?
- Can they understand how to use it? Are new users getting stuck on logging in, choosing tools, or understanding prices?
- Do the records match? Do customer attribution, valid orders, and commission records meet expectations?
Once the first two are working smoothly, then consider adding more content and channels. When posting in communities or groups, also follow their promotion rules, and honestly disclose anything involving invitation commissions.
¶ 5. Finally: first build a website that you yourself are willing to use
Looking back, getting started is not actually complicated: first register an account, understand the Earning Alliance, then create a Studio subsite.
Next, replace the name and Logo, choose a few tools you are familiar with, and clearly write the introduction and customer service information. If needed, then bind your own domain, add tutorials, and provide recommended content.
The platform provides ready-made products and underlying technical capabilities, while you put your time into website configuration, content, promotion, and customer service. However, “leaving the backend to the platform” does not mean that nothing needs to be managed, nor does it mean that the platform bears all usage costs.
There is another boundary worth knowing in advance: a subsite is your own brand entry point; it is not the purchase of a software suite, nor is it a separate user database. Accounts, balances, and plans still use a shared system, and some verification processes and generated file links may also retain public service addresses. For more details, see White-Label Boundaries and Launch Checklist.
If these arrangements meet your needs, there is no need to wait until everything is prepared perfectly.
First open the website and use it yourself once, then ask a few people who genuinely need it to try it. Wherever it is hard to understand, revise the introduction; whichever feature is used most, put it first.
First make it a useful website, then gradually turn it into a service that people are willing to keep using.
¶ Access Links and Detailed Help
- Open Studio, register or log in
- View the Earning Alliance introduction
- Create a Studio subsite: complete steps
- Brand, customer service, and login configuration
- Bind your own domain
- View commission rules The images in this article are from the official help documentation. The brands, prices, and account data in the interface may be examples or historical information. Please refer to your own current page.